How to build connectors and workflows for Infosit DXP with Power Apps
Simon Anicic
30 November, 2022
Power Apps is a collection of applications, services, and connectors that help you create an application with automated processes. With low or even no code at all, you can use it to create feature-rich applications with a responsive design that can run on any device. Apps made with Microsoft Power Apps can connect to not only data stored on Microsoft Dataverse but can also connect to on-premise or online data storage.
Long story short, you can create the application you need, from your own data, without previous knowledge of programming or development.
This how-to article explains Power Apps connectors and flows, and will show you:
- How to create a connector to Infosit DXP API
- How to create a flow
As an example, we will create a flow that sends an email notification about incoming Events in Infosit DXP (data received via API) every day.
Creating a connector
The connector enables a specific service (for example, Microsoft Teams or Microsoft Outlook) to communicate with Microsoft Power Apps in such a way that their communication can be used to trigger some action or to get data.
You can create a connector from scratch or import it from several other services.
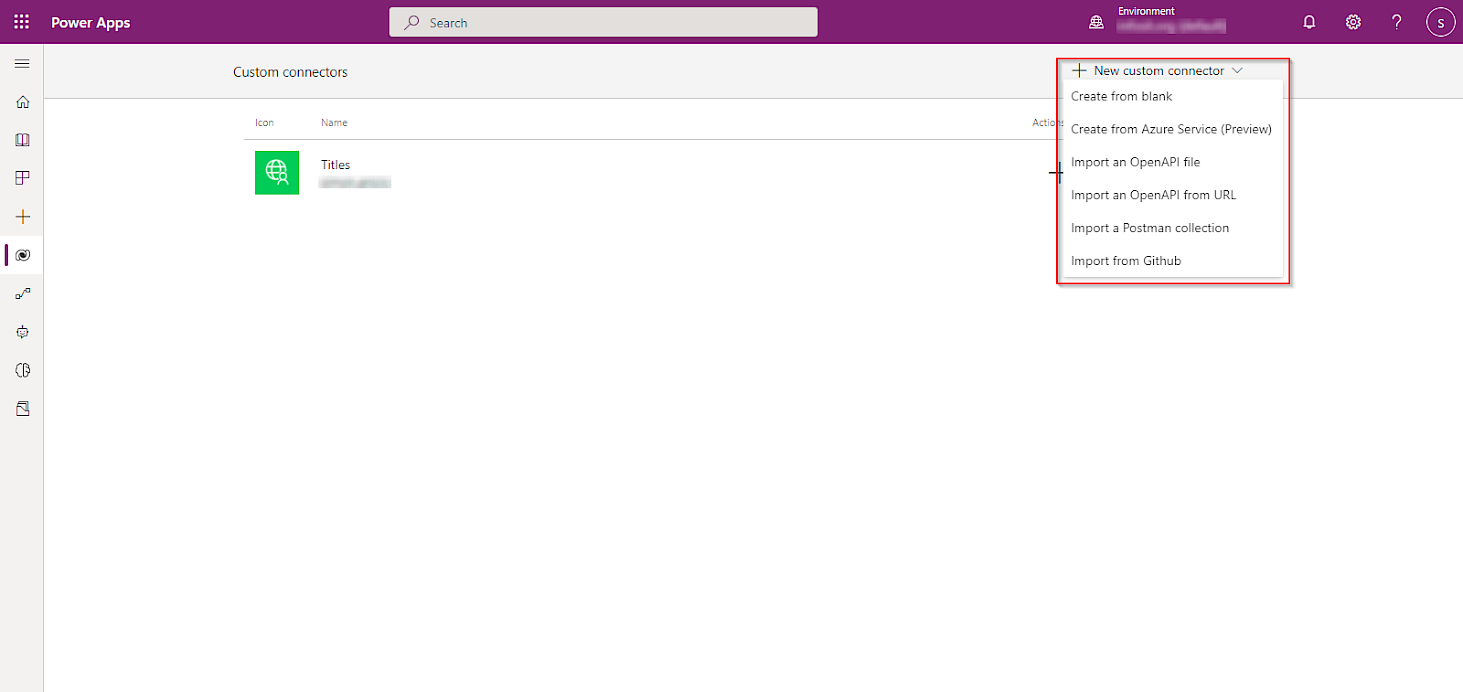
To create a connector, go to the Custom connectors page, click on “+ New custom connector” and choose how you want to create it. To create a connector from scratch, choose “Create from blank” and enter the name of your connector.
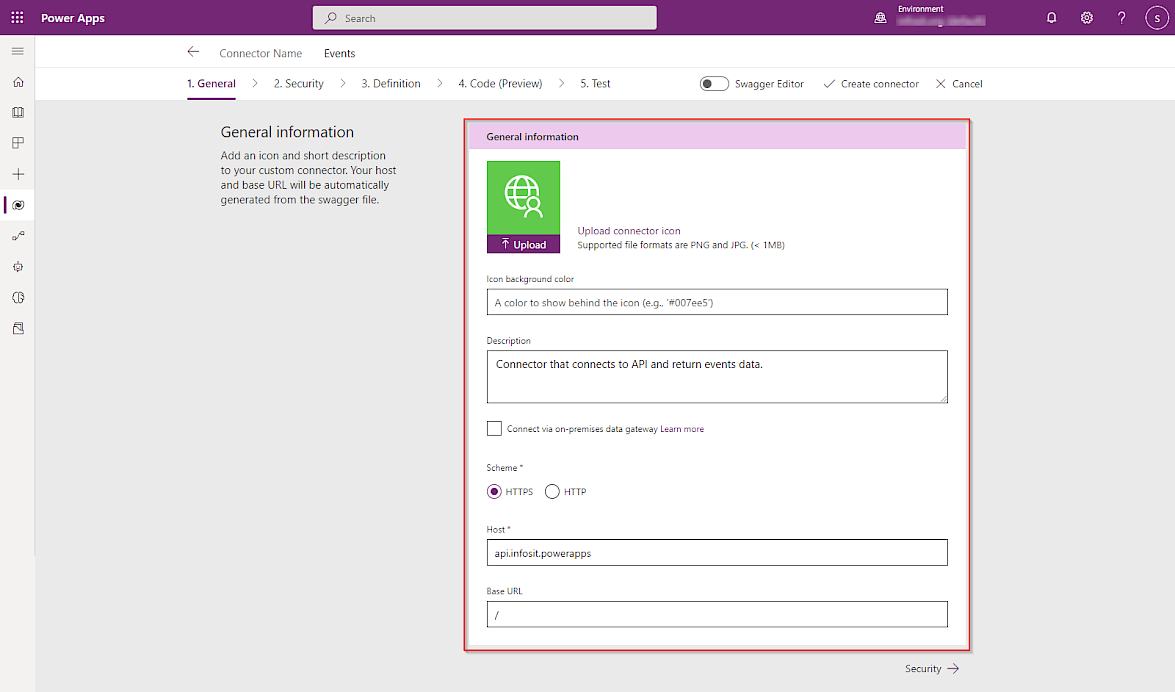
In the next step, you should insert connectors' general information. Host and scheme are required, others are optional.
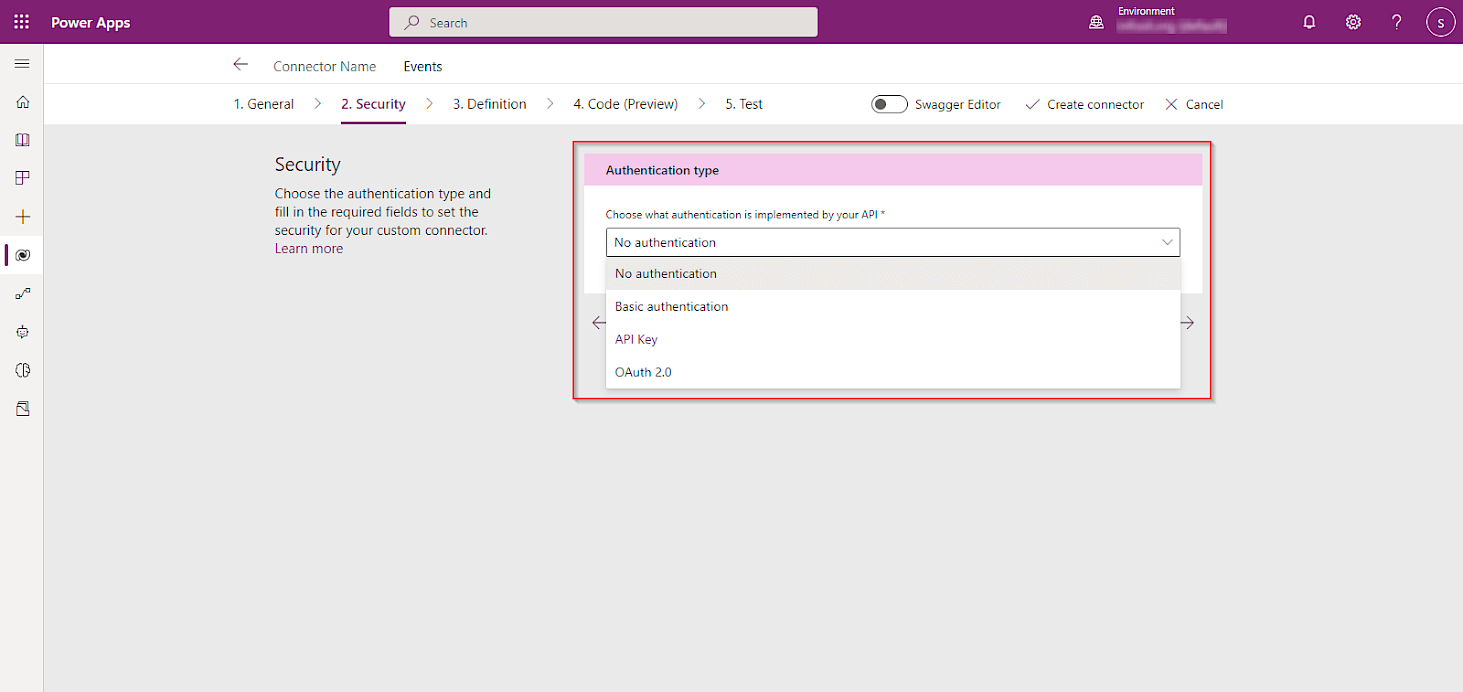
After filling out the General information, you can proceed to Security. In this step, you choose the authentication type implemented by your API.
If there is none, you can select “No authentication” from the dropdown lists. Every other type of authentication will require additional information from you to fill in. For example, “Basic authentication” will require username and password.
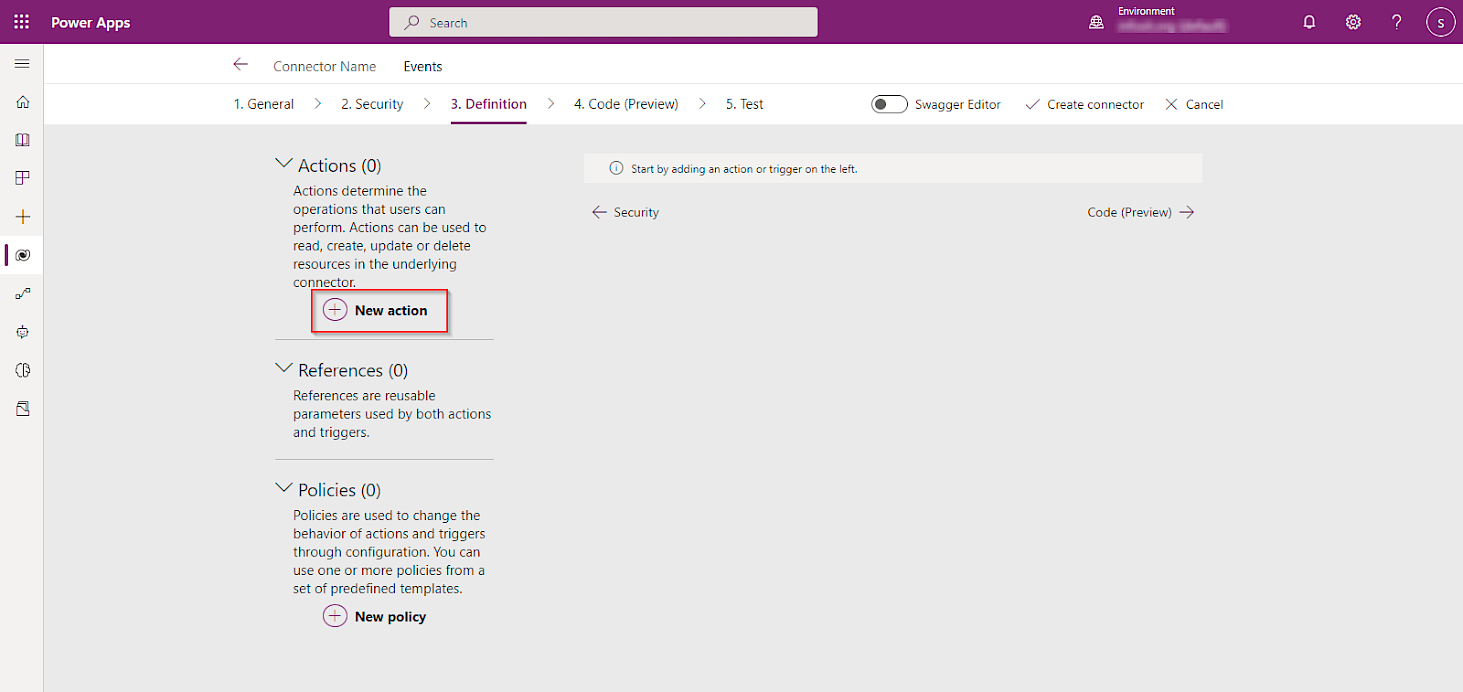
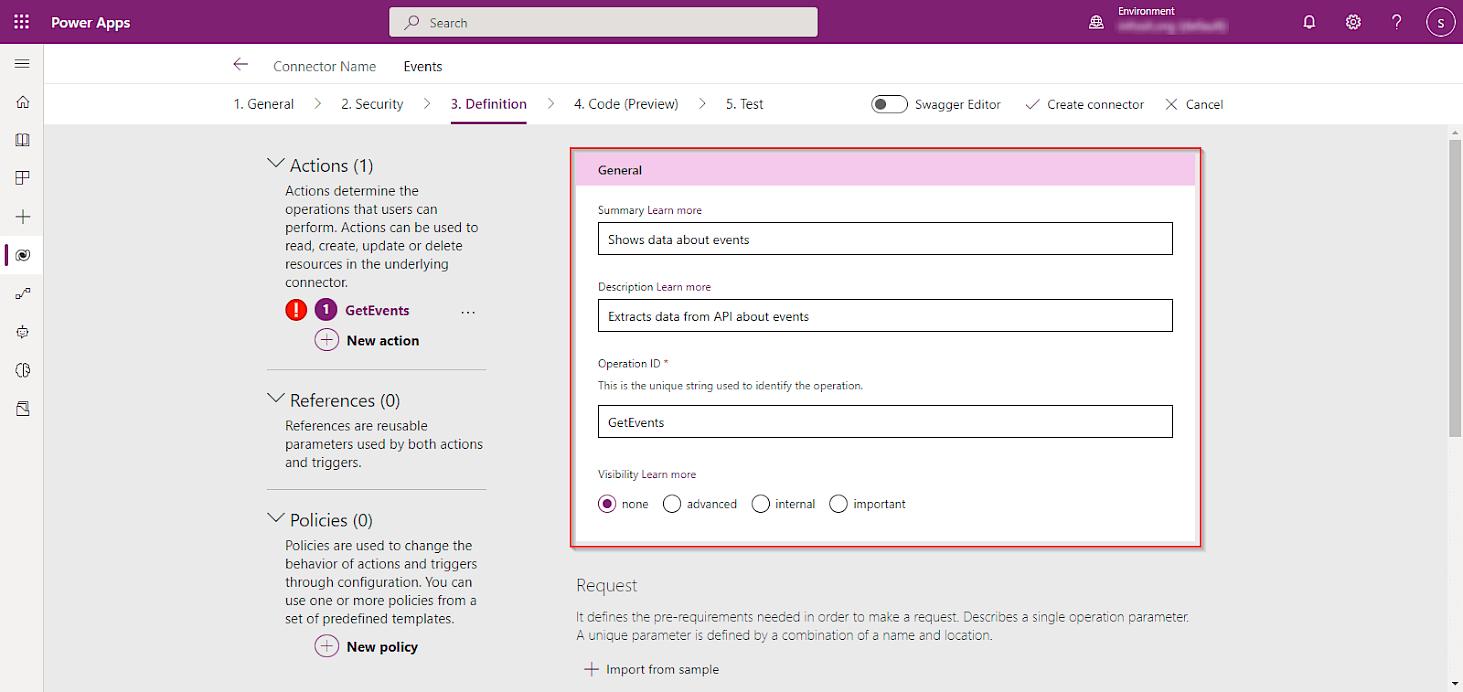
In the next step you will define Actions, or in other words, operations that users can perform – such as read, create, update or delete resources. In this dialog you can also manage References or add a behavior Policy.
In the Actions part, clicking on “+ New action” will create an action and open a section for providing required settings.
Operation ID is the only information required to be filled in the first part of creating a new action. This ID will be the name of an action inside a created connector. Summary and Description will provide additional information about the connector while Visibility will specify how the user will see this information.
Actions need specific parameters to make a request. By clicking on “+ Import from sample” a small page section will appear with radio buttons and input fields (Verb and URL are required). Upon clicking on “Import”, inserted data can be edited by clicking on a button in the Request section.

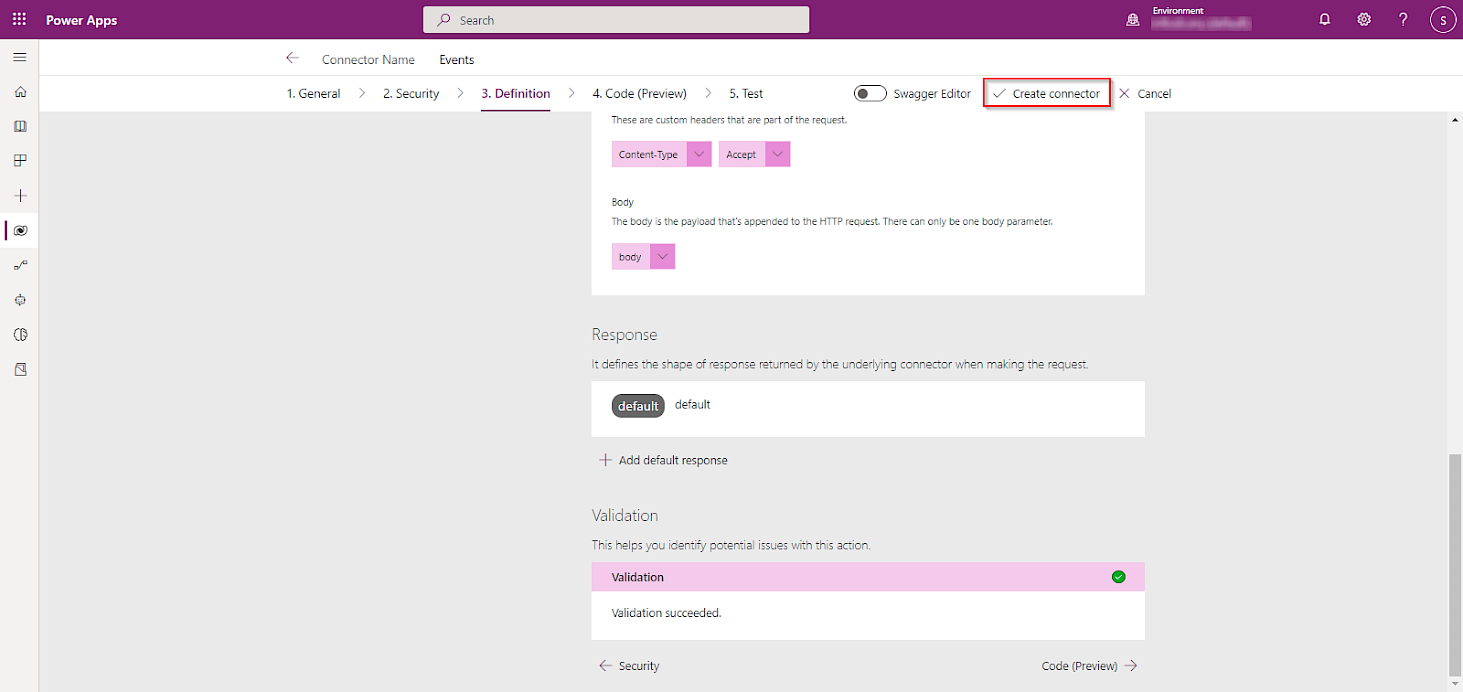
Request returns a response so the shape of it can be defined by clicking on “+ Add default response”. Here a shape can be defined by entering an example of response Headers and Body.

Clicking on “Create connector” will create a connector and save it. Afterwards this connector can also be tested (step 5).
Creating a flow
The application can contain triggers that will fire once that some event has occurred. Triggers can also fire independently. For example, every hour or if some event occurs in the connector (i.e., when a new email arrives on Gmail).
Creating a new flow is fairly easy. You can choose the flow type from the list or create one using a template.

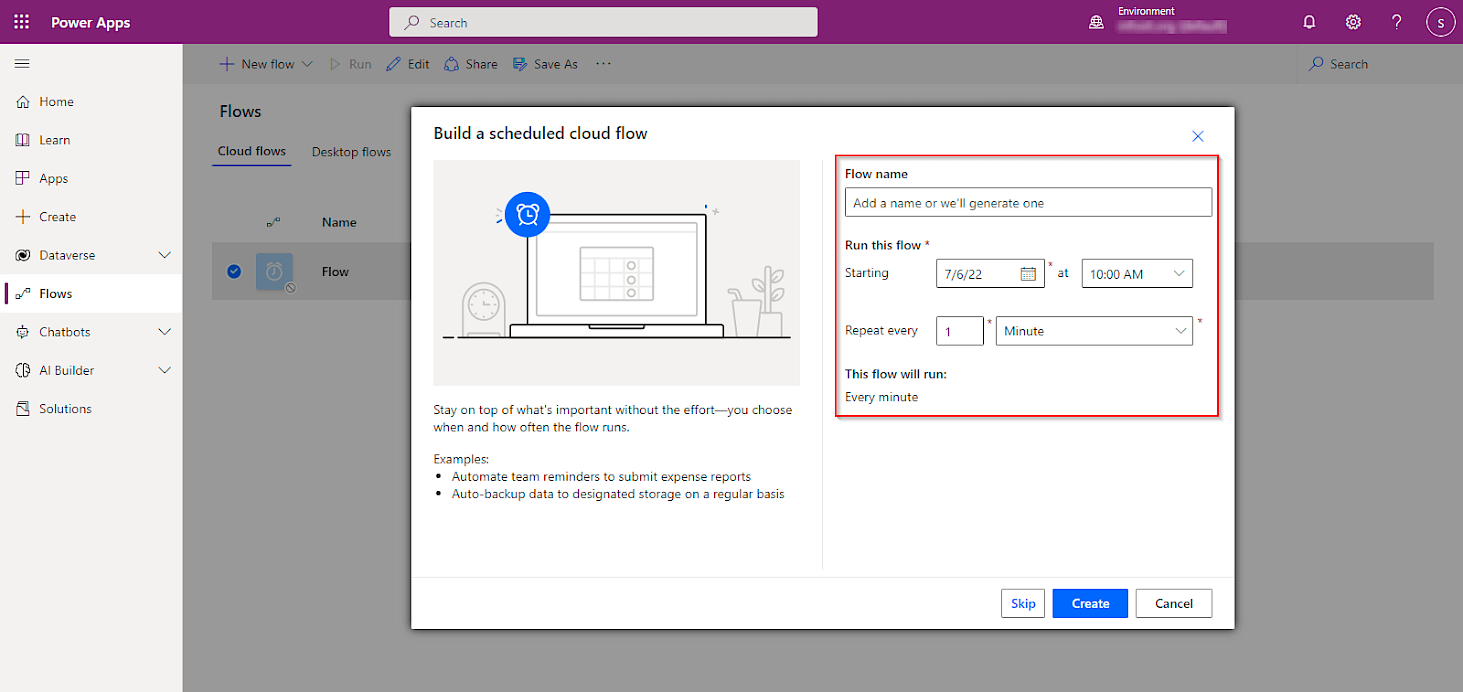
To enable recurrence of some action, you can choose “Scheduled cloud flow” and fill out the required information (flow name, start time, and frequency of recurrence). Later you can change that information, if needed.
By selecting “Create”, the flow is created and you can set the interval of recurrency, start time and also add a time zone. This flow shows a trigger for an action that will be added later in recurrence (at set interval).
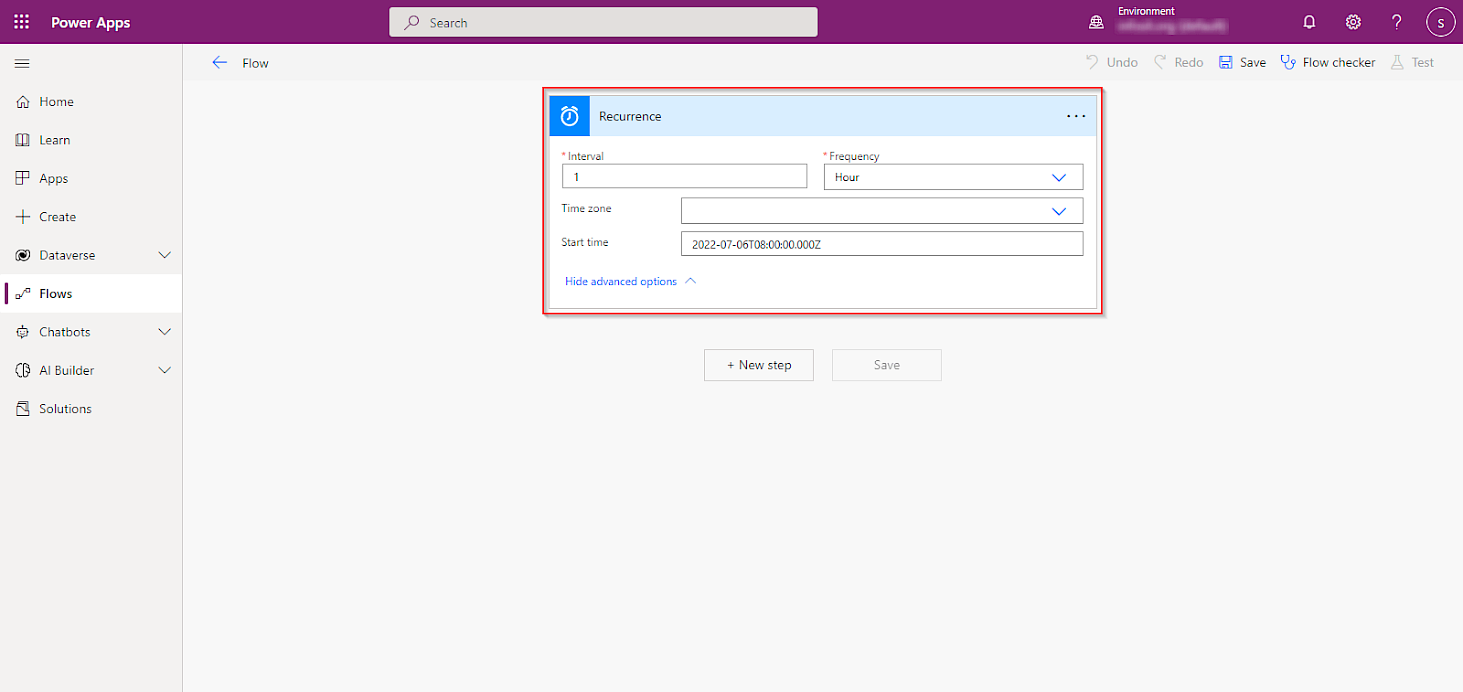
You can then click on “+ New step” which opens a new step in a flow called “Choose an operation”. In this step, there are a wide variety of connectors with their Actions (and Triggers) that can be chosen. Some are built-in (i.e. programming loops or data operations) while some are standard, premium or custom (connectors created by you).
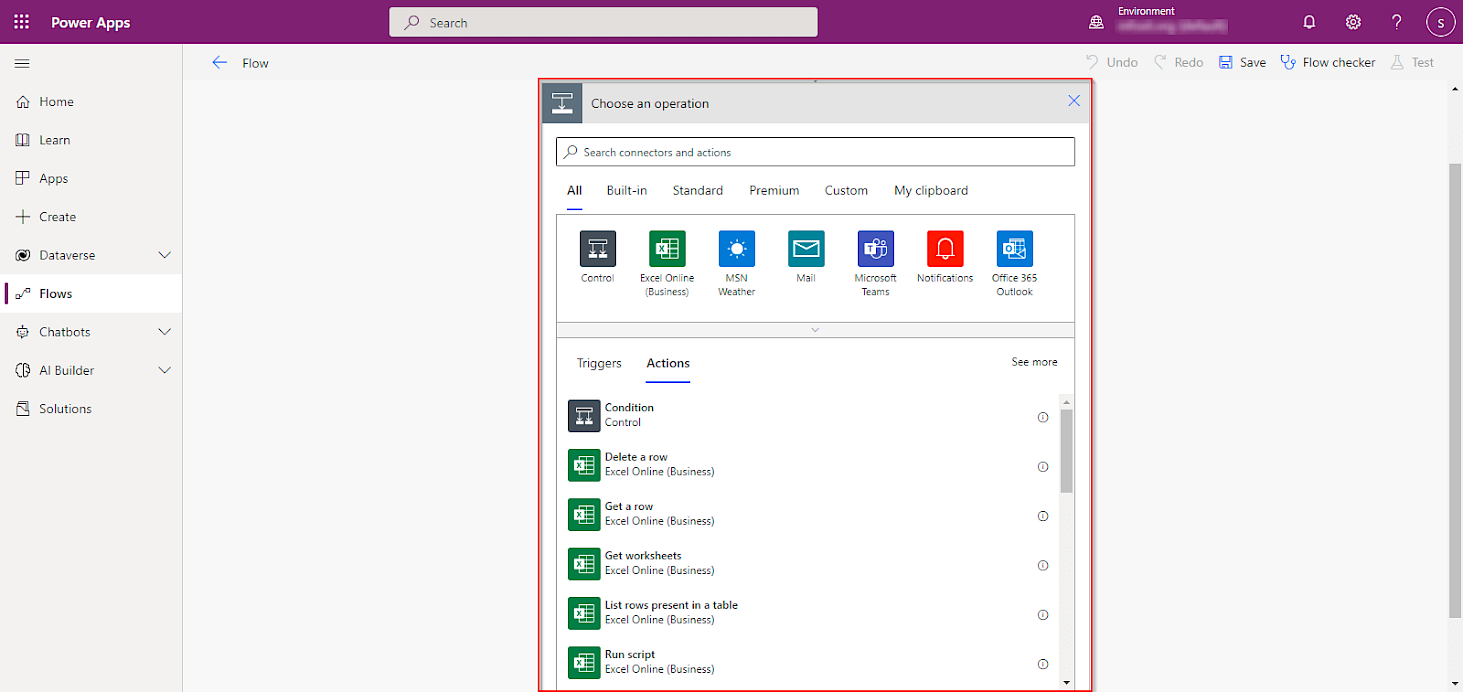
To send an email with data you need to first add a created connector in a flow to receive data from API. To do so, you can choose a connector from the Custom tab.
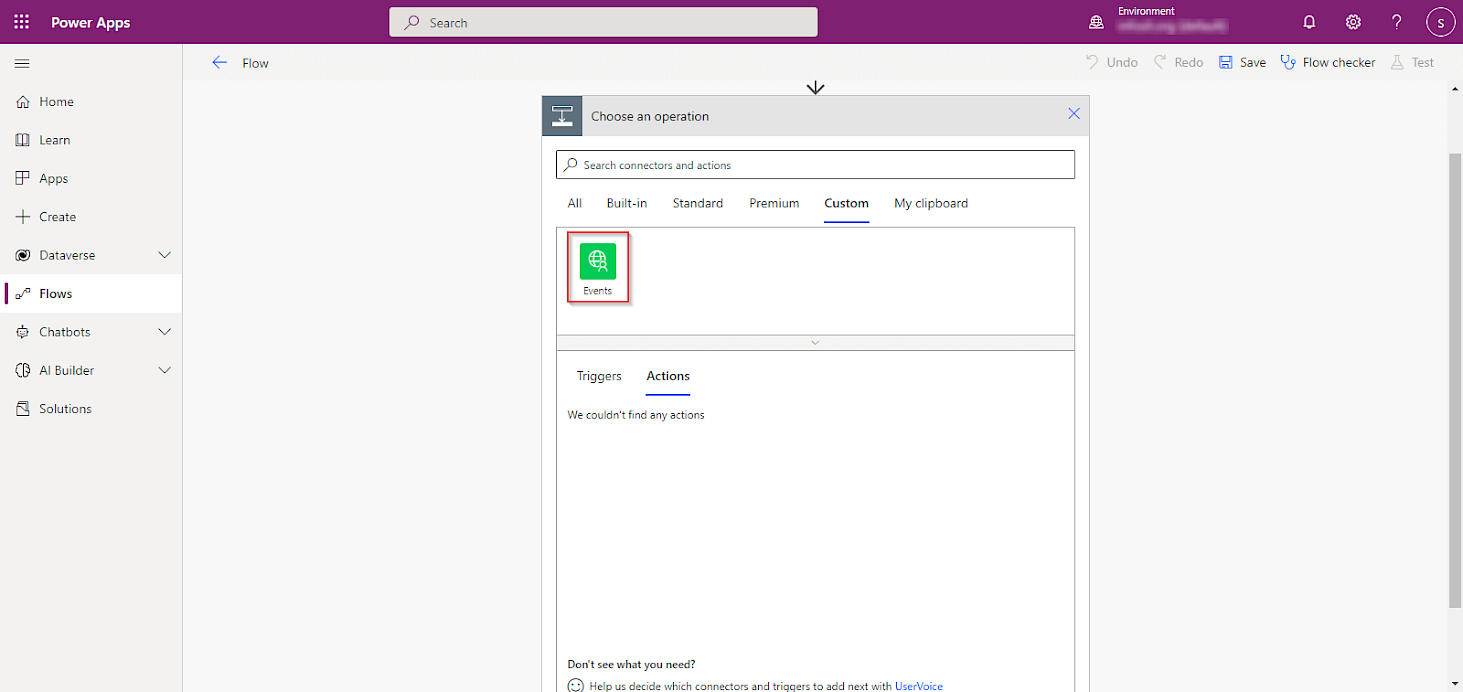
After choosing the connector window shows a list of Actions related to that connector. Select an Action by clicking on it.
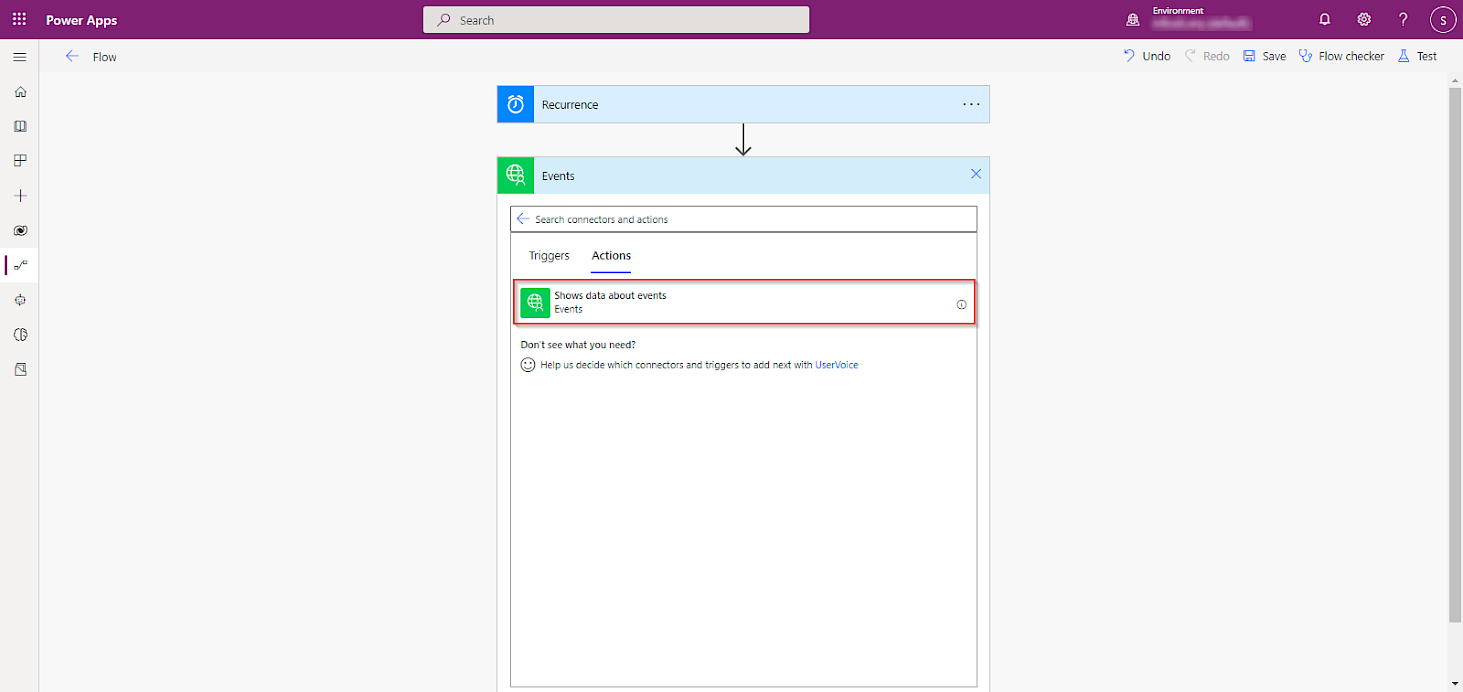
Another step is added in flow and you can input data about Headers and Body of request (required data set while creating a connector). This can be filled out with text but also with Dynamic content or Expression. The Expression can provide an operation that returns today's date and an operation that will allow you to add a certain number of days to it. In this example you can use these operations to get upcoming events that start a certain number of days from each day (i.e. seven days from each day).

Connector contains a request that has a response with an array of objects called “Data”. Each object represents one event. As there are multiple events you can select a new action called “Apply to each” from built-in connector “Condition”. In the input field, an output from the previous step is required because of that a small window appears on the right hand side with variables from the previous step. Clicking on “Title” will result in creating an additional “Apply to each” step as “Title” is contained in an array “Data” which also needs to be looped to receive data of “Title”.
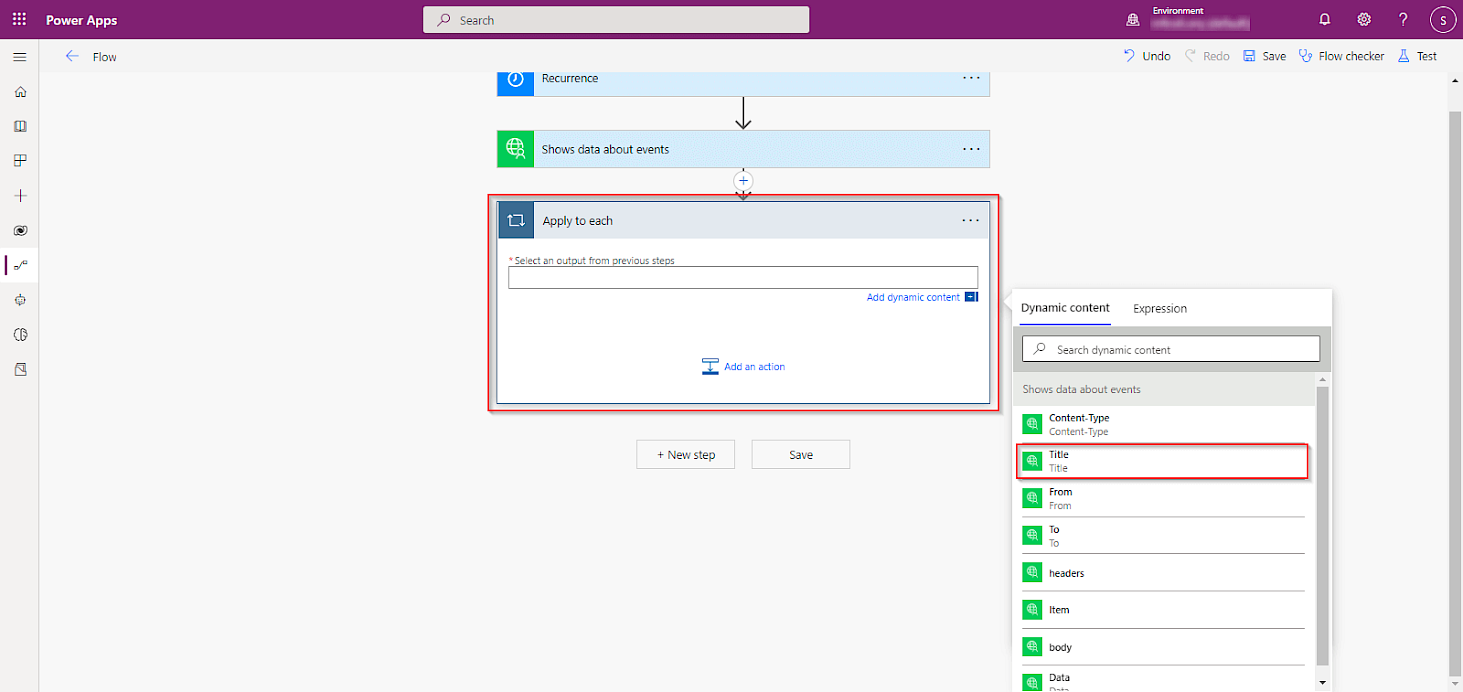

Each loop can conatin an action that will be repeated with every repetition of loop (for every “Title” in this example). Clicking on “Add an action” and choosing a “Send an email (V2)” will create a new step inside the loop with input fields. Input fields allow choosing dynamic content from the response (i.e. “Title”, “From” or “To”). Dynamic content will change depending on a current event in the loop.
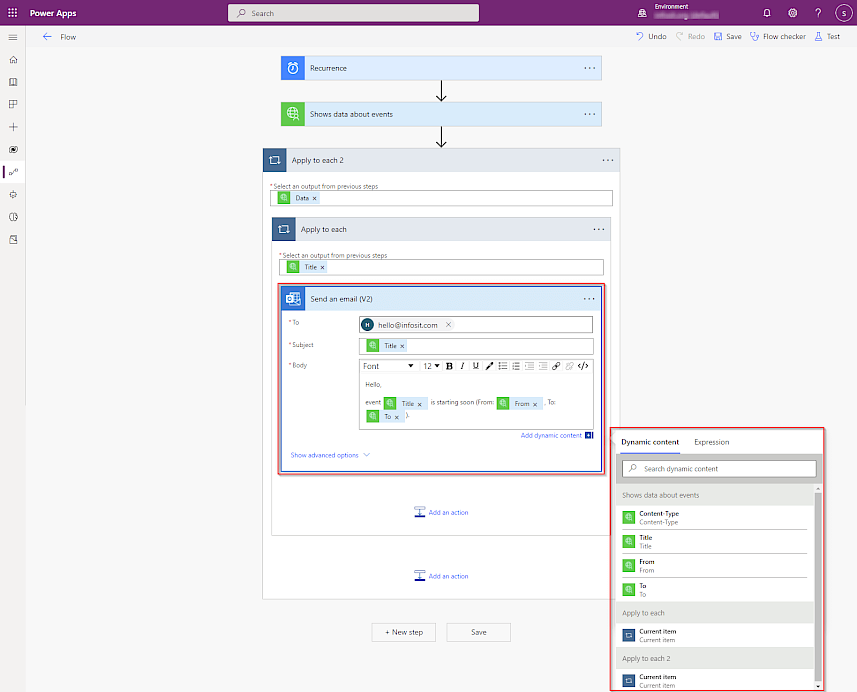
When you are done with creating a flow, you can save it by clicking “Save” in the upper right corner.
Power Apps also offer a lot of helpful additions on controlling and monitoring flows such as seeing run history with status and duration.
From this example, you can see how the concept of API-first solution is crucial for modern citizen development practices. With Infosit DXP content API, you can cover a lot of scenarios that are in focus of your day-to-day work. Enjoy your no-code journey and boost your productivity!
Got a project? Get in touch!
If you’re looking for a results-driven, innovative software development partner to help capitalize on new, profitable opportunities, reinvent your brand, or deliver incremental value to your business, we can help.